Shooting Tips
Building And Using A Tripod Rifle Support
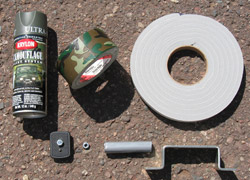 Best Shot - Your tripod adapter requires only (Left, clockwise), camouflage spray paint and tape; closed cell foam; a metal Bar Holder; epoxy cement; and 1:20 coarse thread (1/4") nut that fits the tripod "shoe."
As a precision shooting instructor, I always emphasize the importance of support for your rifle, no matter the terrain or your body position. Whether it's leaning into a tree, plopping your rifle atop a sandbag, or raising your knees in a solid sitting position, you'll always shoot more accurately with support, especially beneath your rifle forearm.
Unfortunately, Mother Nature and tactical circumstances frequently don't provide useful support at the spot where you can best take a shot. Whether hunting antelope in eastern Montana, stalking caribou on Alaska's North Slope, or taking out a Taliban fighter on the Pakistan border, you'll often find that the spot offering the best field-of-view/field-of-fire lacks suitable shooting support.
One solution is to employ an ordinary photographic tripod, modified for rifle shooting. You'll find it inexpensive to build and great for steadying any body position higher than prone.
Fabricating Your Tripod Adapter
Any hardware stocks all the components you'll need to build a tripod adapter -- this is the "cradle" you'll attach atop the tripod. I've seen a variety of cradles fabricated from other things, but the easiest ones I've made used a short length of plastic roofing gutter, or (as we'll use here), a metal "Bar Holder." FYI, a Bar Holder is designed to secure a door by holding a 2 x 4 in place, and only costs about $4.
You'll also need epoxy cement, camouflage or dark tape, a roll of closed cell insulating foam, suitable flat camouflage spray paint, and a 1:20 coarse thread (1/4") nut. The 1:20 nut is the standard size used in photographic equipment. If there's any question about the correct nut size, simply bring along your tripod and size it in the store.
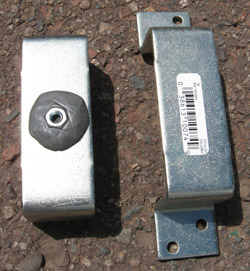 Best Modification - Our modified Bar Holder (L) is now a cradle compared to the store-bought original. After hacksawing and filing burrs off its wing-like extensions, we epoxied the 1:20 coarse thread nut to its center.
When it comes to insulating foam (for padding your cradle), make sure you get closed cell (not "open cell") foam. Open cell foam is sponge-like and sucks up water; closed cell offers denser padding and won't absorb water.
Your first step is to convert the Bar Holder into a U-shaped cradle. Hacksaw the right and left wing-like portions off, then either grind or file down any resulting sharp edges or burrs. Next, epoxy the 1:20 nut to the cradle's bottom, centering it and securing it inside a generous "donut" of epoxy. Make sure the nut is flat against the metal or your cradle will cant on the tripod.
Now, cut short lengths of closed cell insulation and fit them to the top and sides of your cradle. Don't put foam on the bottom or it will interfere with mounting the cradle on your tripod. Next, carefully cover the foam insulation with camouflage tape. Now, finally, spray paint your cradle so all the edges and surfaces are dull and indistinct.
Use the same spray paint to camouflage your tripod, painting it when it's fully extended so you get all the surfaces. Don't just paint it — make streaks and splotches to break up its outline. (The typical discount store tripod is black; if it's not shiny, you can leave part of it black, as I've done.) Your tripod should have come with a "shoe" which clips atop the tripod; attach your cradle to this shoe, screwing the shoe into your 1:20 coarse threaded nut. You're all ready.
The only other things you'll need are a sling -- which you can tape or tie to the tripod, allowing you to carry it over your shoulder -- and (optionally) a sandbag to tie beneath the tripod to help steady it even more, especially if there's a wind.
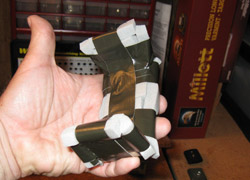 Closed Cell Foam - Cut and fit the closed-cell foam to the cradle's top and edges to serve as waterproof padding. Cover it completely with camouflage tape and then coat it with camouflage spray paint.
Using Your Tripod Support
The great value of having a tripod is the flexibility it offers you when selecting your shooting location. Many locations you might not have considered because they lacked support are now feasible, and you can concentrate on finding the best field-of-view/field-of-fire.
Most of the time, I opt for a spot that offers a useful field-of-view and concealment for a sitting position; this is a good balance between body comfort during a protracted period, and the greater steadiness of extending my tripod to only about half its height. Kneeling isn't nearly so comfortable, nor as steady as sitting.
And when it comes to the height of your tripod, the shorter the better, and the thicker the legs the better. Here's what I mean: Looking at your tripod, note that there are usually three extendable leg segments. The first segment, when the leg is retracted (and shortest) is where it's thickest and least wobbly. Extend the second segment, which is thinner, and the tripod becomes taller with a bit more wobble. Extend the third segment and you'll be using the thinnest leg, and you can see that the tripod's wobblier still. If you also crank up the top mount and cradle — making the tripod tall enough to shoot from a standing position -- you'll find it the least steady.
It's when the tripod is cranked to its highest position (or when the wind begins swaying it), that you most need a sandbag. Tie it beneath the tripod's center, as I've done in the photograph, and it will markedly reduce any movement.
Don't hesitate to fine-tune the leg lengths so you're comfortable at that height. Keep in mind that when your body is comfortable it reduces muscle tension and naturally lends itself to holding your rifle steady.
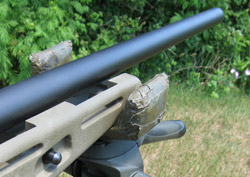 Forend On It - For best stability, don't "balance" your rifle on the cradle, which will cause it to wobble. Only your forearm's forward edge goes in the cradle.
When using the tripod, remove your bipod (if you have one), and for best results, remove the rifle sling, too, so only your forearm is in contact with the cradle.
In the sitting or kneeling positions, you may find it steadiest to turn back your non-shooting hand and hold the butt into your shoulder, similar to when firing prone. When firing in the standing position, use the non-shooting hand to hold the rifle firmly on the cradle, perhaps with your index finger looped over the barrel.
No matter the position, if there's still a bit of wobble don't be too concerned. Lean your body forward or back to achieve something akin to isometric tension, bracing for the steadiest hold.
Like any other shooting technique, firing from a tripod requires live-fire (and dry-fire) practice. But once you've got the knack of it, you'll find that shooting off a tripod will double your range or cut your groups in half, compared to firing without a tripod.
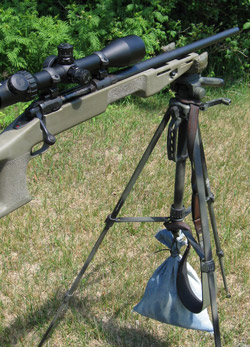 Sling and Sandbag - Suspending a sandbag beneath the tripod enhances stability. Note the sling, which allows carrying the folded tripod over your shoulder.