Shooting Tips
Shooting in the Wind
A little while back, I found myself in South Dakota at Brent Hoffman's Rifle Ranch for some long-range prairie dog shooting. Problem was, the weather proved downright uncooperative, with cold rain and winds gusting to 30 mph. Like the prairie dogs, we stayed indoors, exchanging hunting and shooting stories - but the second day was probably worse than the first. Then Brent's brother, Jeff, (owner and president of Black Hills Ammunition), announced, "Let's go shooting anyway."
Now how many times have you looked out the window, noticed the swaying branches and shuffling leaves and told yourself, "Too windy to shoot today." Actually, if you're ever to learn HOW to shoot under those conditions, that's exactly when you should try some practice fire, as we did. It was pretty fascinating.
Taking on steel targets at 1250 yards with a full (3 o'clock) wind gusting to 25 mph, after one spotting round, Jeff's .338 Lapua bullets were hitting perfectly.
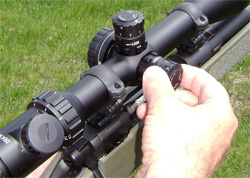 The most precise windage compensation results from target knobs, such as this 1/8th Minute-of-Angle knob on a Millett TRS scope. The Millett LRS has a ¼ MOA knob.
Estimating Wind
When a long-range shooter estimates the wind, he looks at two primary factors - direction and speed. Observing the wind's direction is fairly simple and, as we'll see below, essential to calculating how the wind will affect your bullet in flight. Estimating the wind's speed is where the greater challenge lies.
The traditional rifleman's way of estimating windspeed is by looking around himself and seeing how the wind affects objects. A wind lightly felt upon your face is 3 - 5 mph; a 5-8 mph wind will agitate the leaves on trees; 8 - 12 mph and the wind is raising dust; 12 - 15 mph sways small trees; and water begins to whitecap at 17 mph. Being able to estimate these things with any accuracy requires practice, however.
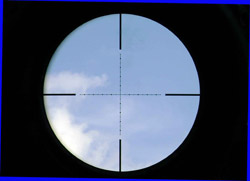
Many competitive riflemen use their spotting scopes to estimate windspeed and direction by observing mirage. We're not talking about mirage in movies, with camels and a vanishing oasis, but the shimmering heat waves that rise from the ground and are pushed (almost imperceptibly) by the wind. To read mirage, look through your spotting scope toward your target, then slightly unfocus the resolution - focus instead on the shimmering heat waves. The angle at which the wind is pushing the heat waves tells you windspeed, as displayed on the accompanying illustration. When mirage rises straight up, there's no wind; when the mirage tips 60 degrees, you have a light 1 - 3 mph wind; tipping even more, to 45 degrees, means a stronger 4 - 7 mph; and by the time it blows parallel to the earth, it's 8 - 12 mph. To learn the wind's direction, slowly rotate your spotting scope right or left until the mirage boils straight up - that means you're looking directly into the wind. To help you visualize this, I shot a photo of mirage through my 20x spotting scope - which is also about the minimum magnification you'll need to see it.
The problem with both of these estimation techniques is that they 'max-out' at less than 20 mph - neither mirage nor wind effect is very useful at higher wind velocities. This has been solved by the recent development of electronic wind gauges. I really like wind gauges, not only to measure the wind but also to evaluate my estimates - that is, I make an estimate using the appearance of objects technique or by observing mirage, then employ my wind gauge to see how accurate I was. When I'm wrong, I analyze the cause so I'm better attuned for the next time. Keep in mind that these marvelous devices measure windspeed ONLY at your location - and there could be several distinct winds between you and your long-range target. When that's the situation, use your electronic gauge as a "yardstick" to note the way the wind is affecting trees and leaves around you, then see how the more distant wind is affecting trees and leaves - is that distant wind the same, slower or faster?
Valuing the Wind
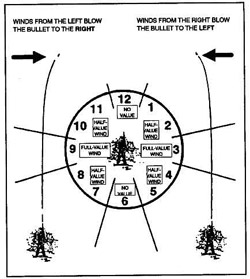
Having made an accurate windspeed estimate and determined the wind's direction, you now determine how this will affect your bullet's flight. First, consider the line between your muzzle and your target in the context of a clock, with 12 o'clock being directly to your front, six o'clock directly to your rear, and 9 and 3 o'clock being left and right respectively. (See the accompanying clock diagram)
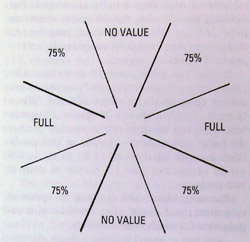
In this context, we first consider the wind's direction. If the wind is coming from12 or 6 o'clock it has no value because it will not drift (push) your bullet right or left; it has no significant effect! Winds coming from 9 or 3 o'clock, however, have the greatest or "FULL" effect. It's the oblique winds, coming somewhere between those four primary directions - from, say, 10:30 o'clock or 4 o'clock - that can be the most perplexing because it only takes a slight direction change to significantly increase or decrease the wind's effect. A rough rule-of-thumb is that winds between the four primary directions are half-value, according to many sources; however, it has been my experience (borne out by data from Sierra Bullets ballisticians) that oblique winds halfway between FULL and No compensation are more deserving of a three-quarters value. These "oblique" angles are where wind estimation - or "doping the wind" - assumes as much art as science, and generates thoughtful discussions over adult beverages.
How to Compensate
Simply put, your bullet will drift in the direction of the wind. To compensate for this, you must aim into the wind, to the right or left, as noted in the accompanying U.S. Army wind drift chart. By aiming right or left into the wind, as the bullet travels downrange, the wind will drift it into the target.
Ballistic software and ammunition manufacturers' websites provide specific wind drift data for your exact load, stated as its FULL VALUE - that is, for a 9 or 3 o'clock wind. Again, look at the clock diagram to figure out how much of this full value applies to your wind. When it's directly right or left, it's full - and the closer the wind direction is to 12 or 6 o'clock, the less its value. Oblique winds - the winds in between - will have values that fall somewhere in between. For example, here's the FULL VALUE 10 mph data for a specific round, the .308, 175-grain Match, with a muzzle velocity of 2600 fps:
| Distance in Yards & Full Value 10 MPH Drift in Inches | |||||||||
|---|---|---|---|---|---|---|---|---|---|
| 100 | 200 | 300 | 400 | 500 | 600 | 700 | 800 | 900 | 1000 |
| 1" | 3" | 7" | 14" | 22" | 33" | 47" | 64" | 84" | 54" |
I've only provided the 10 mph data to make an important point - you don't need mountains of data and an assortment of windspeeds. Just learn the 10 mph, full-value - memorize it or jot it on a 3 x 5 ballistic data card - then you can figure out any application in your head. For instance, say you've estimated a 5 mph wind - use half the 10 mph drift. Or, it's a 4 o'clock wind - use 75% of the full value.
Notice, too, that wind drift grows disproportionately with distance: the full value at 400 yards (14") is more than twice the full value at 200 yards (3"). That's because your bullet is slowing at greater range, giving the wind a bit more time to push it sideways.
I cannot overemphasize this: KNOW the FULL VALUE wind for 10 mph, memorize it, carry it on a card, then mentally adjust it for other speeds and wind directions.
 The Millett Mil-Dot Reticle employs dots to indicate mil-to-mil measurements, and hashmarks to show the halfway points, providing excellent aiming points for windage compensation.
Compensating for Wind
Here's the good news: The least complicated way to compensate for a crosswind is to relocate. To eliminate wind as a factor, physically move until the wind is directly to your back or directly from your front, in respect to the target. Then you don't have to compensate at all! Or, to reduce wind's effect, reduce the distance to your target. The .308 data, above, clearly shows that wind drifts a bullet less as you get closer to the target; instead of taking a very chancy shot at great distance, stalk forward until you're close enough to require a minimum of compensation. Firing that .308 round, even in a full-value, 30 mph wind requires just 3 inches of right or left compensation at 100 yards.
In most situations, repositioning is not an option - then you must compensate by holding your crosshair the required distance right or left INTO the wind. With an ordinary reticle, make your best estimate of what the required distance equals at your target's range, hold that amount off, then break your shot. Let's say the distance is 300 yards, and there's a 10 mph FULL crosswind at 3 o'clock. The .308 data (above) tells you to aim 7 inches into that 3 o'clock wind. Your target is a deer. Knowing the deer's neck is about ten inches wide, you aim three-quarters that width to the right, into the wind, from the animal's heart-lung area, and you've got your trophy.
If you have a mil-dot reticle like that found on Millett's TRS and LRS scopes, you can do the same thing but with more precision. Setting the TRS magnification at10x or the LRS at 25x you use the dots and half-mil hash marks as aiming points. Knowing that one mil equals 11 inches at 300 yards, and you need to aim 7 inches into a 3 o'clock wind, your aiming point is halfway between the first hash mark and the first mil dot - and that's pretty darn precise. Don't be concerned if you're a bit confused -- a future column will deal extensively with using mil dots.
Even more precise than employing mil dots is using a target knob and clicking in the required right or left compensation, then holding dead-on and firing - but it's also the slowest way of compensating. Whether you have a Millett target or TRS scope with1/8 MOA windage knob, or an LRS with a ¼ MOA knob, the principle is the same; just click off the required compensation. In our example you target is 300 yards away, and you must aim 7 inches right; since 1 Minute of Angle at 300 yards equals 3 inches, just click off 2-1/2 Minutes of Angle - that's 10 clicks on a ¼ MOA scope, or 20 clicks on a 1/8 MOA scope - and then aim directly at the target. Again, don't be concerned if this seems confusing - a future column will explain how to use target knobs.
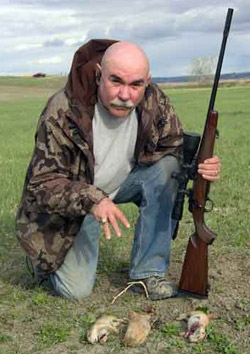 All's well that ends well - After a day of practice firing in rain and strong winds, the author took these three prairie dogs with a single, well-aimed shot.
Nuances and the Wind
We've covered the essentials but there are a few wind nuances worthy of taking into account. In addition to drifting your bullet, wind also pushes your body and can reduce how steadily you hold your rifle. Try to minimize this by physically blocking the wind, and (always!) firing from as solid a support as available.
You may also find yourself facing multiple winds of different directions and velocities. Sensitize yourself to the terrain (especially hills and canyons) around you, and pay heed to how they concentrate or turn the wind.
You may see both gusting and steady winds. In that case, time your shot to fire during the steady wind, which usually is more predictable and consistent.
When confronting a near wind that's different from a far wind, time your shot so it's calm near you and compensate for the far wind. That's because the far wind will have less time to drift your bullet before it reaches the target.
Thanks to that day of windy practice fire, when the weather broke our prairie dog shooting became all the more successful, with many a precision shot placed. My finest shot proved my very last when, waiting for just the right split-second, my single .223 WSSM bullet downed three perfectly aligned prairie dogs - an almost unheard of, "three-fer" shot which even Jeff had never before witnessed. In addition to excellent prairie dog hunting, Brent Hoffman's Rifle Ranch offers challenging long-range and tactical shooting and I highly recommend it. His phone is 605-985-5516.